How to generate and set a Google Street View JavaScript API key
29 May, 2018
Warning: You need to be logged into your Google account to generate a key for Google Maps Javascript API.
Before you can set this browser key in your Tour Manager, you’ll need to generate it. This tutorial will show you how to do that.
TABLE OF CONTENTS
- Generate a new API key
- View your existing API keys
- Secure your existing API keys
- Add API key to the Tour Manager
Generate a new API key
If you do not have a Maps JavaScript API key or need to create a new one, please follow the steps below. If you already have a Maps JavaScript API key, you can add it to the plugin with the steps here.
- Go to the Google Maps Platform
- Click ‘Get Started’
- Check ‘Maps’, and ‘Places’

- Click ‘Continue’
- If you want to use an existing project, please select it from the list. Otherwise, select ‘Create a new project’ and enter a project name.
- Click ‘Next’ to continue
- Click ‘Next’ to enable the APIs for the project
- Copy the generated API key from the popup, you’ll need this to set your key later.
View your existing API keys
- Go to the Google Maps Platform
- If the side menu is not visible, click the three line (hamburger) menu icon
- Click ‘APIs & Services’ (API icon)
- Click ‘ Credentials’ (key icon)
Secure your existing API keys
To prevent quota theft, secure your API key following these best practices.
- Restrict your API keys to be used by only the IP addresses, referrer URLs, and mobile apps that need them: By restricting the IP addresses, referrer URLs, and mobile apps that can use each key, you can reduce the impact of a compromised API key. You can specify the hosts and apps that can use each key from the GCP Console Credentials page and then create a new API key with the settings you want, or edit the settings of an existing API key.
- Restrict your API keys to be usable only for certain APIs: If you have multiple APIs enabled in your project and your API key should only be used with some of them, restrict usage of that key to those APIs. You can specify the allowed APIs for each key from the GCP Console Credentials page and then create a new API key with the settings you want, or edit the settings of an existing API key.
- Delete unneeded API keys: To minimize your exposure to attack, delete any API keys that you no longer need.
- Regenerate your API keys periodically: You can regenerate API keys from the GCP Console Credentials page by clicking Regenerate key for each key. Then, update your applications to use the newly-generated keys. Your old keys will continue to work for 24 hours after you generate replacement keys.
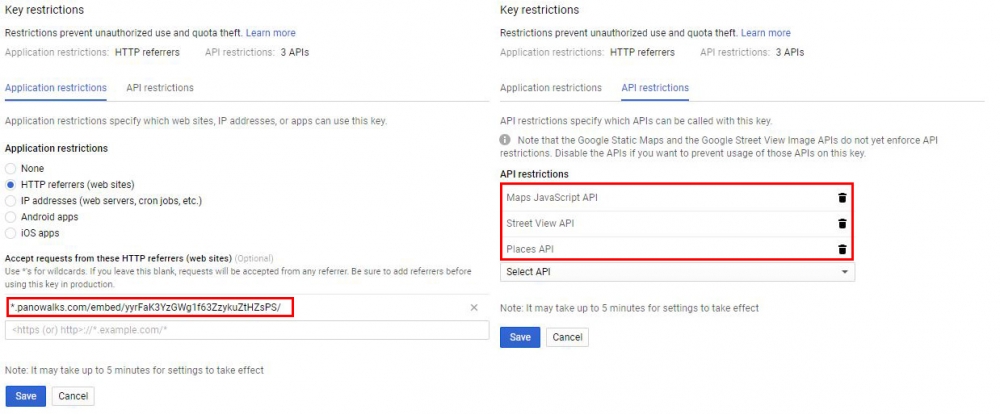
We use the following APIs:
- Street View API
- Maps JavaScript API
- Places Api
Add API key in your Tour Manager
- Copy the API key you created from the Google Maps Platform.
- Log in to your PanoWalks account. When you’re logged in, open your tour manager.
- Click on ‘Settings’.

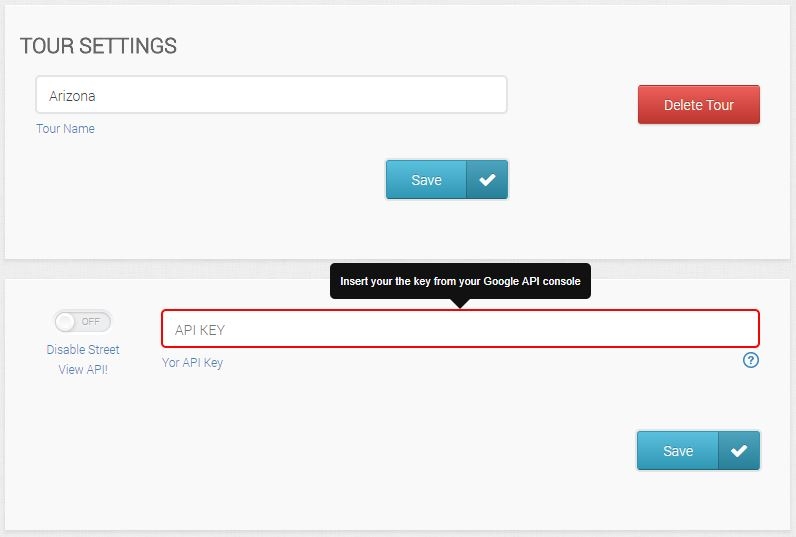
- Paste the API key you copied in step 1 into the ‘Google Maps API key’ field.
- Click Save Changes.
If you have trouble displaying Google maps on your site, please verify that the Google Maps Javascript API is enabled in the Google Maps API Manager.